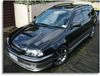
Just had my GTT fail a WOF for scattered dipped beam. Turns out that my headlights are dusty (Inside).
So the question is are there any quick fixes? Or is it a case of buying some new Headlights?
If it's the latter anyone breaking a Caldina or best to go to Mr Revhead? Just like to know whether it's my arm or leg i'm going to have to part with.
Dusty Headlights Caldina GTT
Moderator: The Mod Squad
21 posts
• Page 1 of 2 • 1, 2
Dusty Headlights Caldina GTT
![]() by magnazan » Fri Jan 18, 2008 12:32 pm
by magnazan » Fri Jan 18, 2008 12:32 pm
-
magnazan - Toyspeed Member
- Posts: 77
- Joined: Fri Jul 20, 2007 4:53 pm
- Location: Tha shore fo sure
![]() by Bling » Fri Jan 18, 2008 12:35 pm
by Bling » Fri Jan 18, 2008 12:35 pm
give me a washout, i'm guessing you can completely remove the bulbs from the lights, so do that, then take the lights themselves out of the car, get some water and detergent mix happening and rinse them out.
I'd try that before looking at buying new lights, if its just dust this should work. Make sure you leave them in the sun for a while tho to warm up and evaporate all the remaining water inside the light.
I'd try that before looking at buying new lights, if its just dust this should work. Make sure you leave them in the sun for a while tho to warm up and evaporate all the remaining water inside the light.
-
Bling - ** Moderator **
- Posts: 15990
- Joined: Mon Dec 22, 2003 9:02 pm
- Location: Quake City
![]() by barryogen » Fri Jan 18, 2008 1:27 pm
by barryogen » Fri Jan 18, 2008 1:27 pm
You can put them in the oven at ~60C and it is enough to pull them apart and wide the inside... but replacing them if you fcuk up would probably be expensive...
maybe you could stuff a cloth through the bulb hole and wipe it?
maybe you could stuff a cloth through the bulb hole and wipe it?
dave.net.nz
Project "Better Altezza" - Dave Style
http://forums.toyspeed.org.nz/viewtopic.php?p=659132
Comments
http://forums.toyspeed.org.nz/viewtopic.php?p=659134
Project "Better Altezza" - Dave Style
http://forums.toyspeed.org.nz/viewtopic.php?p=659132
Comments
http://forums.toyspeed.org.nz/viewtopic.php?p=659134
-

barryogen - 2ZZ Guru in training
- Posts: 2692
- Joined: Thu Oct 13, 2005 8:38 am
- Location: Dunedin
![]() by magnazan » Fri Jan 18, 2008 1:38 pm
by magnazan » Fri Jan 18, 2008 1:38 pm
I think either way i'm going to have to remove the headlights. Anyone removed them before? Any Tips?
I know the Metal Clips that hold the bulbs in are a PITA to remove, but the whole headlight...
I know the Metal Clips that hold the bulbs in are a PITA to remove, but the whole headlight...
-
magnazan - Toyspeed Member
- Posts: 77
- Joined: Fri Jul 20, 2007 4:53 pm
- Location: Tha shore fo sure
![]() by 2LTR Rona » Fri Jan 18, 2008 2:23 pm
by 2LTR Rona » Fri Jan 18, 2008 2:23 pm
if I remember rightly Caldina headlights are STUPIDLY expensive brand new, something like $700 or $800 a piece. I remember fivebob (think it was him) posting this a while back but cant find the post now.
So....if you do pull them apart Dont break them
So....if you do pull them apart Dont break them
-

2LTR Rona - Toyspeed Member
- Posts: 1903
- Joined: Wed Aug 11, 2004 3:43 pm
- Location: Wellington
![]() by cedwards » Fri Jan 18, 2008 6:42 pm
by cedwards » Fri Jan 18, 2008 6:42 pm
magnazan wrote:I think either way i'm going to have to remove the headlights. Anyone removed them before? Any Tips?
I know the Metal Clips that hold the bulbs in are a PITA to remove, but the whole headlight...
Pretty easy to remove actually once you know how.
First step to remove the indicator, look at top of headlight there is a bolt on the fender end and just infront of it a hole in the plastic with a white hex key like fitting (adjusts headlight tilt I think) next to this fitting is a hole going down into fender.. Get a good torch an look into this hole. You need to push a flat head screwdriver into this hole and should find a clip that when gently pushed down releases the indicator. (If you have your service manual still, be it in japanese there is a diagram)
Step 2 undo two top bolts on headlight and also the screw in the centre of grill then unclip grill from headlight, also if I remember correctly there is a bolt exposed by the removed indicator.
Step 3 unbolt metal trim that sits under headlight and indicator and with some jiggling remove, (beware jiggling can leave small scratch on fender side of trim)
Step 4 Headlight should be relatively free now, will still be attached underneath to a clip that allows it to pivot forward and back, unclip wiring harness from back of headlight then you should be able to pull forward on headlight and have it pop out of this lower pivot. I found it easier to slide it sideways toward the indicator first then pull forward and up.
Takes about ten- fifteen minutes a side but dont rush it. Good luck
PS may wanna look at new bulbs while you are in there save some hassel in the future and may be part of failed wof cause although unlikely
- cedwards
- Toyspeed Member
- Posts: 114
- Joined: Fri Jun 08, 2007 1:00 pm
- Location: North Shore
![]() by magnazan » Fri Jan 18, 2008 7:08 pm
by magnazan » Fri Jan 18, 2008 7:08 pm
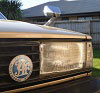
Well not sure if washing it is going to do any good. I took a closer look at it this arvo and well this is what it looks like:
Passenger side:

Drivers Side:

Wondering whether it's even fixable.
Passenger side:
Drivers Side:
Wondering whether it's even fixable.
-
magnazan - Toyspeed Member
- Posts: 77
- Joined: Fri Jul 20, 2007 4:53 pm
- Location: Tha shore fo sure
![]() by flygt4 » Fri Jan 18, 2008 7:33 pm
by flygt4 » Fri Jan 18, 2008 7:33 pm
if i remember correctly a caldina headlight is worth like a million dollars from toyota.
i remember when we got ours revhead mentioned to put something over them so they dont get cracked by stones
i remember when we got ours revhead mentioned to put something over them so they dont get cracked by stones
-
flygt4 - Toyspeed Member
- Posts: 3820
- Joined: Sat Sep 20, 2003 6:57 pm
- Location: Wellington
![]() by cedwards » Fri Jan 18, 2008 7:36 pm
by cedwards » Fri Jan 18, 2008 7:36 pm
They actually look pretty clean a bit of debri/corrosion on the reflector shouldn't really cause that much scatter, I wouldn't think.. You sure you have the right bulbs in, have had a car fail a wof before for similar reason and it had the incorrect bulbs fitted by prev owner.
- cedwards
- Toyspeed Member
- Posts: 114
- Joined: Fri Jun 08, 2007 1:00 pm
- Location: North Shore
![]() by fivebob » Fri Jan 18, 2008 7:43 pm
by fivebob » Fri Jan 18, 2008 7:43 pm
At $650 for a new one last time I checked you'd best try fixing them first.
Looks like brake dust or similar debris has got in through the hole where it's missing the park light bulb. Easiest solution might be to try an air duster through the hole to shift the dust to a place where it will do no harm. Failing that ,take them off and rinse them out, and make sure you dry them properly.
Looks like brake dust or similar debris has got in through the hole where it's missing the park light bulb. Easiest solution might be to try an air duster through the hole to shift the dust to a place where it will do no harm. Failing that ,take them off and rinse them out, and make sure you dry them properly.
-
fivebob - Toyspeed Member
- Posts: 3879
- Joined: Fri May 02, 2003 5:12 pm
- Location: Tauranga
![]() by Lloyd » Sat Jan 19, 2008 11:12 am
by Lloyd » Sat Jan 19, 2008 11:12 am
Just give them a quick blow out with an air gun if its only dust. The top picture it looks like the dark stuff is only on a surround? The reflector on the back look fine so I'd imagine it would give a decent pattern. Park a few meters away from a wall tonight and see if it gives a nice obvious line that goes flat and then slopes up to the left.
-

Lloyd - ** Moderator **
- Posts: 6195
- Joined: Tue Oct 15, 2002 1:50 pm
- Location: Dunedin
![]() by cedwards » Sat Jan 19, 2008 3:00 pm
by cedwards » Sat Jan 19, 2008 3:00 pm
Not sure ask toyota..
Also though I can't see properly from you photo's but the centre section the bulb feeds through into looks very different from mine? Can you when looking straight at the headlight see the end of the light bulb? Or is it covered by a centre cap, it looks as there is a hole through the centre cap to the bulb???
Check your bulbs also for a little cupped metal reflector within the bulb i'm pretty sure they should have them.
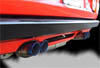
Are you sure it is these lights causing the scatter and not poorly aligned driving lamps in the bumper?
Also though I can't see properly from you photo's but the centre section the bulb feeds through into looks very different from mine? Can you when looking straight at the headlight see the end of the light bulb? Or is it covered by a centre cap, it looks as there is a hole through the centre cap to the bulb???
Check your bulbs also for a little cupped metal reflector within the bulb i'm pretty sure they should have them.
Are you sure it is these lights causing the scatter and not poorly aligned driving lamps in the bumper?
- cedwards
- Toyspeed Member
- Posts: 114
- Joined: Fri Jun 08, 2007 1:00 pm
- Location: North Shore
![]() by magnazan » Tue Jan 22, 2008 6:45 am
by magnazan » Tue Jan 22, 2008 6:45 am
The 'cap' you speak of isn't on my main lights just on my main beams. I took a look at my friends GT and his does have the caps on all bulbs.
Are they required?
What are they doing?
Can you buy them separately?
Are they required?
What are they doing?
Can you buy them separately?
-
magnazan - Toyspeed Member
- Posts: 77
- Joined: Fri Jul 20, 2007 4:53 pm
- Location: Tha shore fo sure
![]() by cedwards » Tue Jan 22, 2008 9:18 am
by cedwards » Tue Jan 22, 2008 9:18 am
Yes mine are definitely the same as the high beams.
I would think without the cap there you would get a pinhole effect of the bulb's filament which would produce an uncontrolled dipped beam. (more so than dust)
quite often though dipped bulbs have their tips coated in a grey like paint to help avoid this, is this the case with your bulbs?
Ask you friend nicely if you can borrow his bulbs for a trial run...
I don't think you would be able to buy them seperately new.. check with rev.
But you should definitely be able to source a broken headlight from a fellow ts member or wrecker for cheap from which you could salvage the caps. ( could possibly only need one headlight as contains two caps)
Or try swapping the caps from your high beams to your driving lights as it shouldn't affect warrantability on your high beams.
- cedwards
- Toyspeed Member
- Posts: 114
- Joined: Fri Jun 08, 2007 1:00 pm
- Location: North Shore
![]() by Bling » Tue Jan 22, 2008 4:41 pm
by Bling » Tue Jan 22, 2008 4:41 pm
depends how well sealed they are, I tried braxtons to take my rear lights apart but they are glued at factory so they couldn't do anything apparently..... either that or they were just too lazy to do something
-
Bling - ** Moderator **
- Posts: 15990
- Joined: Mon Dec 22, 2003 9:02 pm
- Location: Quake City
21 posts
• Page 1 of 2 • 1, 2
Who is online
Users browsing this forum: No registered users and 23 guests