Engine Knocking PT2

The place for all technical car discussions. If you haven't already, read our Disclaimer first!

Moderator: The Mod Squad

Engine Knocking PT2

Postby Leiden » Fri Feb 20, 2009 8:03 pm

Hi Guys,

Thought I'd make a new thread as the old one started going off topic,

Here's where I'm at so far:

I've pulled the head off the motor. As I was stripping it I checked the P/S Pump, Water Pump, Idler Pulley, Harmonic Balancer, Camshaft Bearing's, and VVTi Pulleys. All seemed fine with no obvious damage. Bearings are all smooth and clean, no marks or scrapes. Slight discolouration in a few where the metal was darker than normal.

Once the head was off I was expecting to see something like bore damage, marks on the head from where the piston was knocking, but nothing obvious.

Turned the motor over and checked all the bores, they are mint, no scratches, marks, etc. All still have a light cross-hatching on them. Next I checked the pistons by rocking them in the bore, #1, #2, & #3 all didnt move that much, and were sitting central in the bore with an even space all around.

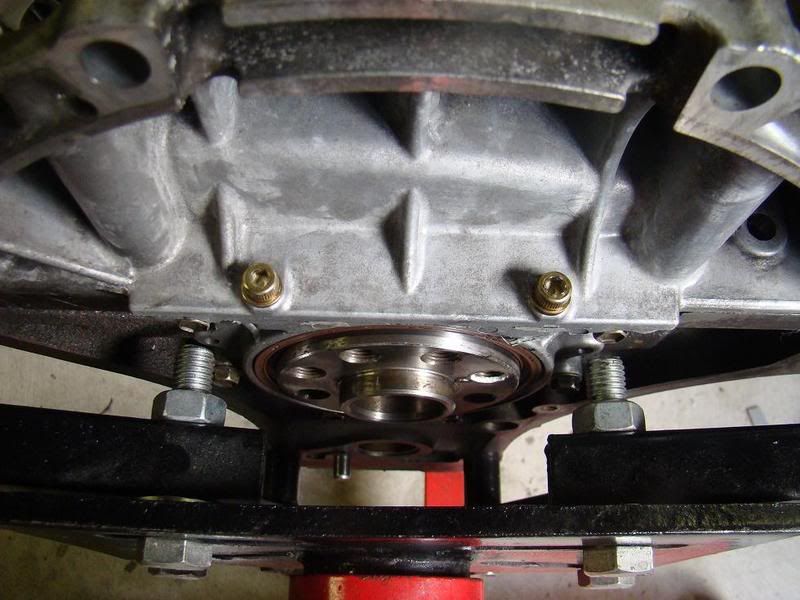
#4 on the other hand had a little play in it, and was sitting up against the front facing side of the bore with next to no gap on the front face, but on the rear of the bore had about a 1mm gap. The attached pictures should give you more of an idea...

Image Image Image Image Image Image

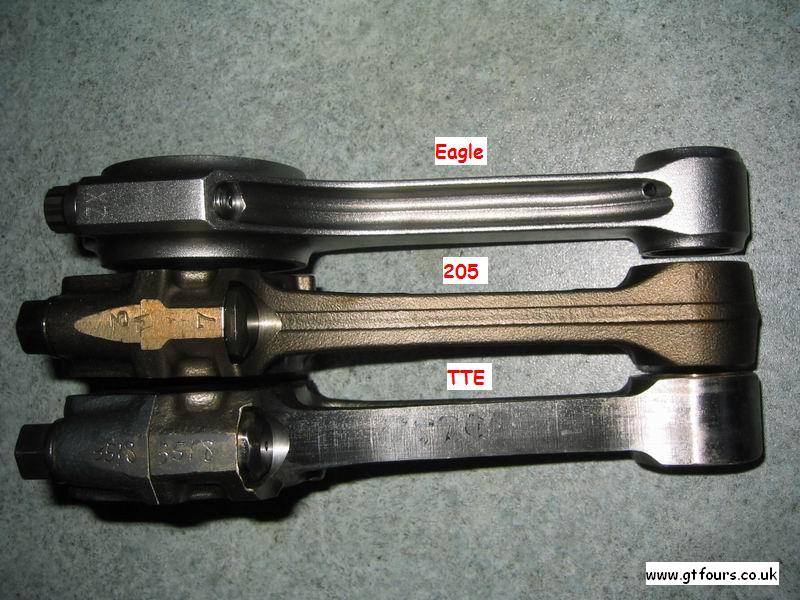
Last one is the most interesting and shows the piston sitting to one side. So what do you guys think? Bent Conrod or Gudgeon pin? Any comments would be appreciated!
Leiden
Toyspeed Member
 
Posts: 128
Joined: Mon Aug 27, 2007 10:31 pm
Location: Whangarei

Postby Lloyd » Fri Feb 20, 2009 8:25 pm

And the bottom end??? You wont tell anything from the top
User avatar
Lloyd
** Moderator **
 
Posts: 6195
Joined: Tue Oct 15, 2002 1:50 pm
Location: Dunedin

Postby Leiden » Fri Feb 20, 2009 9:27 pm

Just made another discovery!!

At the bottom of #4's stroke right at BDC (Bottom Dead Center) the engine gets slightly harder to turn over and you can see the #4 piston rock towards the back of the motor! Then it gets easier again and the piston returns to its before position (Hard up against front of the bore). Also at TDC #4 is sitting slightly lower in the bore than #1 Piston...Strange...

Could it be the bottom of the piston hitting the crank counterbalance? Would it do that with a broken ring or does that sound like a bent rod/wrist pin?
Leiden
Toyspeed Member
 
Posts: 128
Joined: Mon Aug 27, 2007 10:31 pm
Location: Whangarei

Postby Lloyd » Fri Feb 20, 2009 10:07 pm

TAKE THE BOTTOM END APART
User avatar
Lloyd
** Moderator **
 
Posts: 6195
Joined: Tue Oct 15, 2002 1:50 pm
Location: Dunedin

Postby sergei » Fri Feb 20, 2009 11:15 pm

Since you got that far, pull the bastard apart :).
Anyway I think you wil find that you have stuffed con rod bearing among other things, I am saying that because you have noticed that one piston will sit lower than others, also if you try to rotate continuously you will notice that near tdc and bdc that piston will lag slightly.
User avatar
sergei
Mad Russian
 
Posts: 8406
Joined: Wed May 15, 2002 12:06 pm
Location: North Shore

Postby Leiden » Sat Feb 21, 2009 10:20 pm

Ok Guys... How the &*#$ do you get the sump tray off??

I've removed the 4x 14mm bolts, 8x 12mm bolts, 9x 5mm Hex bolts, as far as I can see theres nothing holding it to the motor apart from the TONS of seal packing,

I tried prying it off at the rear of the sump pan and ended up breaking a small piece out of the sump pan at the back, luckily where the flywheel is so it wont leak oil...I've bent about 5 screw drivers trying to pry it either side of the rear of the thing and it still hasnt budged...

Do I need to remove the gearbox too? Stupid mechanic and his over zealous seal packing :/
Leiden
Toyspeed Member
 
Posts: 128
Joined: Mon Aug 27, 2007 10:31 pm
Location: Whangarei

Postby Lloyd » Sat Feb 21, 2009 10:25 pm

When you get all the sump plug bolts out you'll probably have to work right around it with a screwdriver and a small (ish) hammer
User avatar
Lloyd
** Moderator **
 
Posts: 6195
Joined: Tue Oct 15, 2002 1:50 pm
Location: Dunedin

Postby Leiden » Sat Feb 21, 2009 10:27 pm

So I dont need to remove the gearbox to get the sump off?
Leiden
Toyspeed Member
 
Posts: 128
Joined: Mon Aug 27, 2007 10:31 pm
Location: Whangarei

Postby Lloyd » Sat Feb 21, 2009 10:29 pm

No, just take all the bolts out around the sump. The couple at the gearbox end are likely harder to get out but the gearbox shouldn't have to come off
User avatar
Lloyd
** Moderator **
 
Posts: 6195
Joined: Tue Oct 15, 2002 1:50 pm
Location: Dunedin

Postby Leiden » Sat Feb 21, 2009 10:37 pm

Yup I've removed the 4x bolts holding the sump to the bell housing, It would help if I had an engine manual the one I bought off trademe only covered the head and rear main seal :(

I might get the blow dryer out and try and soften the seal packing then use a small screwdriver and go from there... Time for a shower and a movie... sick of cars tonight :cry:
Leiden
Toyspeed Member
 
Posts: 128
Joined: Mon Aug 27, 2007 10:31 pm
Location: Whangarei

Postby RomanV » Sun Feb 22, 2009 1:38 am

You've taken the oil pan off seperately right?

There are some bolts under there which need to be taken off too.

But yeah it can be a PITA to get the sump off.
User avatar
RomanV
Toyspeed Member
 
Posts: 4915
Joined: Wed Aug 13, 2003 12:17 am
Location: West Auckland

Postby Leiden » Sun Feb 22, 2009 1:53 am

Yup I took that small metal pan off first and removed the 7 5mm hex bolts that were inside, and also the other 2 5mm hex bolts at the rear of the sump

I still have the belt pulley on the crank, do I need to remove anything behind it?
Leiden
Toyspeed Member
 
Posts: 128
Joined: Mon Aug 27, 2007 10:31 pm
Location: Whangarei

Postby jondee86 » Sun Feb 22, 2009 9:45 am

Leiden wrote:Yup I've removed the 4x bolts holding the sump to the bell housing,
It would help if I had an engine manual the one I bought off trademe only
covered the head and rear main seal :(

The 16V FSM shows the use of a SST that has a broad, thin blade. Sort
of like a spatula or better quality putty knife. The blade is hammered or
otherwise forced into the joint, and then hammered sideways to slice
thru the sealer. The oil pan is removed first, and then the baffle plate,
using the same technique for both. I imagine 16V and 20V are similar.

Levering with screwdrivers may get the job done, but because the force
is concentrated in a small area, the chances are you will damage the pan
or baffle plate.
1984 AE86 Corolla GT Liftback, NZ new... now with GZE
spec small port, twinscrew s/c and water/methanol injection :)

Watch this space >>> <<<
User avatar
jondee86
Toyspeed Member
 
Posts: 903
Joined: Mon Aug 18, 2003 11:08 pm
Location: Wellington

Postby evil_si » Sun Feb 22, 2009 9:46 am

no, just give it a good wack with a soft hammer, if you have all the bolts out
User avatar
evil_si
Toyspeed Member
 
Posts: 2353
Joined: Sat Nov 01, 2003 6:19 pm
Location: TAURANGA, Pyes Pa

Postby Distrb » Sun Feb 22, 2009 6:49 pm

Have you got these bolts out??

http://i90.photobucket.com/albums/k244/ ... C03058.jpg

just need a 5mm hex through the nicks in the sump arrangement, i forgot these when pulling mine to bits. :lol:
www.hccc.org.nz 1986 Fx-Gt; 1999 Altezza
User avatar
Distrb
Regular Poster
 
Posts: 4756
Joined: Thu Jan 23, 2003 4:23 pm
Location: Wellington

Postby Leiden » Sun Feb 22, 2009 7:12 pm

And the verdict is...Bent Rod!

The piston & rings are still in good condition, apart from the small amount of material missing from the bottom where the counter balance was rubbing up against it...

Bearings look good with no obvious damage, what do you guys think of the bearings? Think they look ok?

Here's the pictures:

Image Image Image

Question: Since the piston & rings are ok would it be safe to reuse them making sure they go back into the same bore's as before or will I need to get new rings and have the bore's honed?

Here's the plan if funds permit:

ACL Bearings, New Engine Mounts, 2x Head Gasket's, 3SGTE Rods, Will leave the pistons they've held up this far so it looks like the Rods are the Beams weak link!
Leiden
Toyspeed Member
 
Posts: 128
Joined: Mon Aug 27, 2007 10:31 pm
Location: Whangarei

Postby Lloyd » Sun Feb 22, 2009 7:21 pm

While its all in bits you may as well put rings and bearings through it. Look alright from the pic though. Get the crank ckecked

Why 2 head gaskets?
User avatar
Lloyd
** Moderator **
 
Posts: 6195
Joined: Tue Oct 15, 2002 1:50 pm
Location: Dunedin

Postby Leiden » Sun Feb 22, 2009 7:27 pm

Unfortunately when I priced up a set of rings they came out to cost $400+ so I'm trying to avoid that if possible,

Compression numbers were still really good so I dont think it would need them, I know that it would save in hassles in the long run but I just need a drivable car for cheap at the moment.

Well some of the Boys over at Altezzaclub decided to use 2x Factory Metal Head-Gaskets to drop the compression to 10.5:1 instead of being limited to about 10psi at 11.5:1 compression. Works out good because new gaskets are only around $90 bucks, alot cheaper than aftermarket gaskets
Leiden
Toyspeed Member
 
Posts: 128
Joined: Mon Aug 27, 2007 10:31 pm
Location: Whangarei

Postby sergei » Mon Feb 23, 2009 8:51 am

random info:
http://www.gtfours.co.uk/pics/rods/tte_ ... le/003.jpg
from:
http://www.gtfours.co.uk

Anyway I would suggest using 3SGTE rods (if you can, some one has to confirm this)... as they certainly look fatter.
User avatar
sergei
Mad Russian
 
Posts: 8406
Joined: Wed May 15, 2002 12:06 pm
Location: North Shore

Postby MAGN1T » Mon Feb 23, 2009 9:22 am

Leiden wrote:Can get some ST185 rods because the ST215 pistons I'm looking at have a bent rod on one of them (Trademe :P)


Leiden wrote:The rod was bent because the guy hydro locked the engine, his Mechanic said the pistons and 3x other rods are ok, but yes, I've heard that the rods are weaker than previous generations,


That sort of tells you something.

Maybe yours hydrolocked too when you took your foot off the gas? It's a bit hard to see a rod bending like that by any other means? but then I find it difficult understanding how a hydrolock happens in the first place.

edit, I'd have thought that you'd have pulled the motor out. The early 3S cranks are pretty bad for cracking with spun bearings, wouldn't be a bad idea to have it checked before reassembling.

Steve
Computers make you go mad.
MAGN1T
!USER HAS BEEN BANNED!
 
Posts: 646
Joined: Mon Jun 10, 2002 11:34 pm

Next

Return to Tech Questions

Who is online

Users browsing this forum: Google [Bot] and 12 guests