Polishing Stainless Steel Headers

The place for all technical car discussions. If you haven't already, read our Disclaimer first!

Moderator: The Mod Squad

Polishing Stainless Steel Headers

Postby MR2BOY23 » Sat Jun 06, 2009 3:00 pm

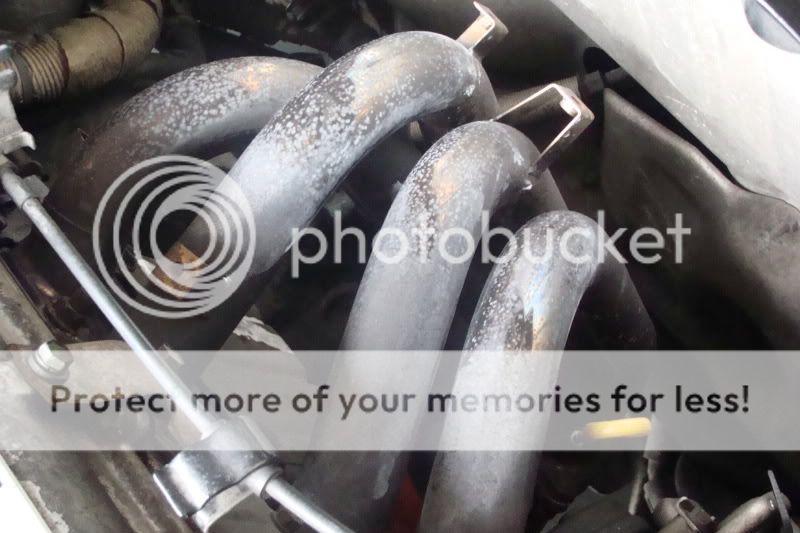
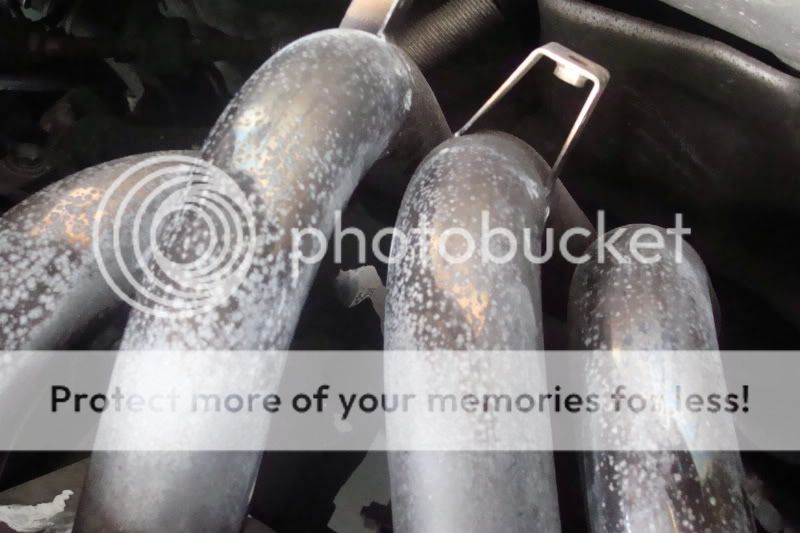
So I've got some fujitsubo super ex headers and they've turned a darkish sort of brown colour with white patches of oxidation. Do people polish these to make them shine again? If so what would you use? I've tried a bit of autosol but doesn't seem to do it.

These are the ones here Fujitsubo - Super Ex - http://www.nengun.com/fujitsubo/super-exmade out of a 304 stainless steel.

I've also heard that this is discolouration is the metal properties of 304 stainless steel rising to the surface to form a protective layer to stop the metal from corroding.. If so would polishing them cause them to corrode?

I don't know a lot about metals and had a search on these forums and the net but didn't find anything useful, so I thought I'd start a thread.

Before
Image

After
Image
Image[/list]
MR2BOY23
Toyspeed Member
 
Posts: 1500
Joined: Tue Nov 11, 2008 11:30 am
Location: Hong Kong

Postby Guss » Sat Jun 06, 2009 3:45 pm

Stainless steel is a misconception should be stain resistant.
oxide of S.S is chromium based hence it stays shiny.
looks to me like its been contaminated with something caustic, plenty of fluids under the hood are that.
scrub harder or take to it with sand paper. better yet put the heat shield on.
Guss
Toyspeed Member
 
Posts: 123
Joined: Wed Jan 26, 2005 7:50 pm
Location: Auckland

Postby MR2BOY23 » Sat Jun 06, 2009 5:27 pm

FXGTV wrote:Use the google search function, as per your instructions on someone elses thread.


If you had actually read my post, you would see that I searched several forums and used google as well, but didn't find any useful and conclusive information. I thought I might ask on here to get peoples ideas/opinions/ previous experiences etc.

The other thread is very different, as it took me 2seconds to find the information through the google search, a 'how to on changing input level to wave'

Anyway back on topic...
MR2BOY23
Toyspeed Member
 
Posts: 1500
Joined: Tue Nov 11, 2008 11:30 am
Location: Hong Kong

Postby FXGTV » Sat Jun 06, 2009 7:05 pm

I realised who lame it sounded so i deleted it before you had replied :P
1988 r31 TI Skyline.
1982 ra60 Celica (my Aussie Toyota and axle stand warrior).
ex: 1991 Corolla, 1989 fxgt-v, 1985 aw11. 1992 sw20 gt-s. 2002 glxi Lancer wagon (work hack)
next car - another a-dub please!
User avatar
FXGTV
Toyspeed Member
 
Posts: 1703
Joined: Tue Sep 06, 2005 7:57 pm
Location: Brisbane

Postby Truenotch » Sat Jun 06, 2009 8:59 pm

Just get some Autosol metal polish and give them a buff for starters. Use it the same as any polish - wipe on with one cloth and wipe off with another. Work it in well and then wipe off with a clean rag. If it's not shiny then you could try a more abrasive compound with a buff on the end of a drill.
User avatar
Truenotch
Toyspeed Member
 
Posts: 1960
Joined: Sun Jan 09, 2005 3:41 pm
Location: Hamilton

Postby QikStarlie » Sat Jun 06, 2009 9:38 pm

best way would be to get some acid (the type used after tig welding stainless) paint it on leave 10 mins, wash off. will come up a dull silver finish. you can then easily polish from there, with autosol or something
User avatar
QikStarlie
Toyspeed Member
 
Posts: 1110
Joined: Tue Mar 25, 2003 10:30 pm
Location: lost..

Postby 85AW20v » Sat Jun 06, 2009 10:58 pm

Try a scotchbrite pad and see how you get on - in an inconspicuous place first of course. I seem to remember from years ago that was what a stainless fabricator used after welding 2 sink benches together.
See ya

Simon
85 MR2 20v
User avatar
85AW20v
Toyspeed Member
 
Posts: 1059
Joined: Fri May 24, 2002 6:18 pm
Location: Taupo, NZ

Postby mr2low » Sun Jun 07, 2009 12:25 am

"If you have a finished product that you are trying to maintain a mirror finish on, at least 95% of hand polishes are a big no, no. Most of them will do no more than clean the surface at best, and at worst they will make it hazy by leaving light scratches in the finish. This is because they cut a little and loose their edge in rapid fashion.

The polish must have a serious abrasive to do anything. With most stainless, monel, etc, hand polishing is pretty much a waste of time. English Custom Polishing is one of the few manufactures of liquid polishes that will cut these metals, but be prepared for slow going.

If you are trying to do any more than clean up a mirror finish which is in good shape, forget it unless you have power tools. With a fabrication you cannot use abrasive compounds and buff wheels to remove machine or grain marks from manufacture as you can in aluminum or other softer metals. You have to cut with the correct tools. I like the nonwoven wheels, belts and discs. I don't like to bandy about trade names but sometimes one company has the product, Seco. They manufacture the finest bladder wheels and beltfiles in the world. When you have a large area, it's time to use belts for straight line stability.

Nonwoven belts and wheels will give you a reasonable finish, but still leave you a long way from that perfect mirror. The Seco tools are accompanied by a select range of belts, from 30 to 600 grit. It is important that at every stage you remove all signs of the previous cut, which will not always be easily visible. So we try to make each cut cross it's previous one at 90 degrees, this way we can see the scratches.

From here on in it will not be quite as easy to see the scratches as the finish comes up to your mirror.

Now it is time to buff wheel.

The first cut should be done with a good heavy stainless compound, and a good stiff buff wheel. At English Custom Polishing we find the pleated reinforced canvas is best as it carries plenty of abrasive, is stiff enough to put it down on the piece, and has a degree of flexibility for irregular shapes. The cut should be done in consistent straight lines of course and when finished will leave quite a nice, even mirror.

The next two stages should consist of a fine stainless abrasive and a finer chrome oxide. The fine stainless cut should be done with a pleated mill treated buff. These are still quite stiff and do an excellent job. The finest cut should be done with an untreated canvas buff. The medium and fine stainless compounds tend to vary in color, depending on the manufacturers dyes.

Each cut should, where ever possible, cross the previous one at 90 degrees. This will show up any marks left in from the previous cuts. Only when all marks are gone are we ready to proceed to the next cut. Once you are satisfied with your final stainless cuts it is time to move on to a good quality chromium oxide. Chromium is what gives stainless steel its brightness, so when we use a chrome oxide it is the perfect compliment and really brings your mirror up to an outstanding finish. Use a good quality linen buff for this operation. Now you should really have something worth looking at. The finishing touches are about to be done.

We do a final cut with a top quality calcined aluminate. These are superfine abrasives, which are quite hard, but very, very light cutters. That will do no more than remove very slight surface imperfections, and really bring the mirror to its ultimate lustre. This cut should be done with a very loose linen or cotton buff. If you like carnauba, here's your chance to use it to its full effect. Carnauba will not hurt these metals as long as it is removed every 12 months or so. Apply your carnauba, by hand. Make sure that not a single piece is uncovered and give it a few minutes to dry.

Once it has dried on the workpiece buff it off with a domet flannel buff. The more you buff the brighter it will get. I mean brighter! Call your friends, fire up the barbeque, pour out the beer and hand out the shades. You are now ready to show them you work"

Thats how the pros do it
mr2low
Toyspeed Member
 
Posts: 46
Joined: Fri Aug 01, 2008 10:01 pm

Postby Bazda » Mon Jun 08, 2009 10:00 pm

Take them off, take them down to Jack the polisher. He is off Sunnybrae road on the shore in Parity Place next to High Velocity.

Would cost around $60-80 to repolish it up.

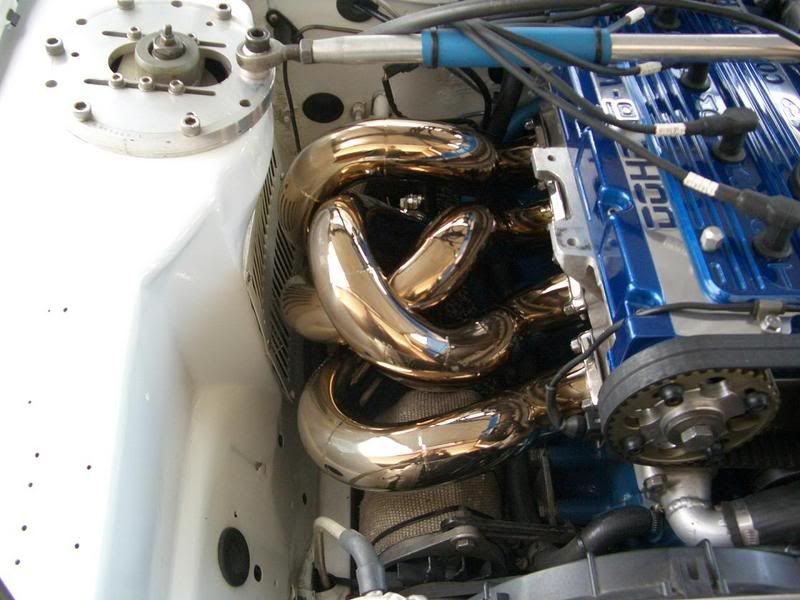
And then it will look like this, but you have to keep them clean all the time as if there is any grease etc on them when hot it will stain.

Image
1988 Toyota Levin GTZ 410kw atw @26psi
Join us on facebook - MRP - Manon Racing Products
http://www.mrpltd.co.nz
Turbonetics|Fortune Auto Coilovers|Wilwood brakes|Tilton clutches|
User avatar
Bazda
Toyspeed Sponsor
 
Posts: 5713
Joined: Sat Jun 01, 2002 10:32 pm
Location: Auckland

Postby rollaholic » Tue Jun 09, 2009 7:33 am

whose car is that baz?

surely the heatwrapping on the alternator makes it overheat?
BASU!
User avatar
rollaholic
Toyspeed Member
 
Posts: 5383
Joined: Fri May 28, 2004 2:19 am
Location: West is Best

Postby Bazda » Tue Jun 09, 2009 8:02 am

Dads Escort with a cossie 2L N/A.
More heat comes from the exhaust, all the esky guys like to protect the alternator.
1988 Toyota Levin GTZ 410kw atw @26psi
Join us on facebook - MRP - Manon Racing Products
http://www.mrpltd.co.nz
Turbonetics|Fortune Auto Coilovers|Wilwood brakes|Tilton clutches|
User avatar
Bazda
Toyspeed Sponsor
 
Posts: 5713
Joined: Sat Jun 01, 2002 10:32 pm
Location: Auckland


Return to Tech Questions

Who is online

Users browsing this forum: Google [Bot] and 8 guests