Guide to removing ST215 Caldina headlight

The place for all technical car discussions. If you haven't already, read our Disclaimer first!

Moderator: The Mod Squad

Guide to removing ST215 Caldina headlight

Postby Sick Puppy » Sat May 28, 2011 5:57 pm

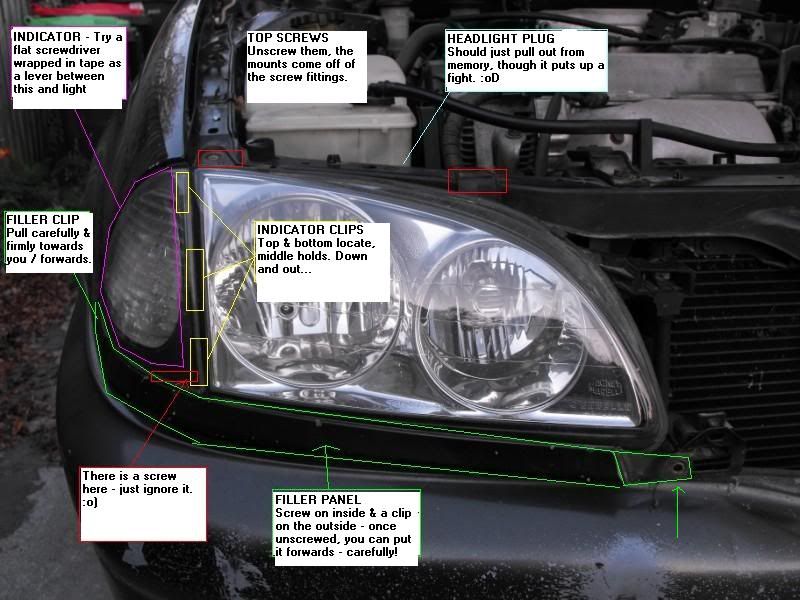
Alrighty then, with the help of those below, I managed to get this sucker out, so here's the how to:

Image
1. Remove Grille - there is a screw on the top in the centre that attaches it to the cross member/bonnet catch.

There are also four clips, two each side, top and bottom.

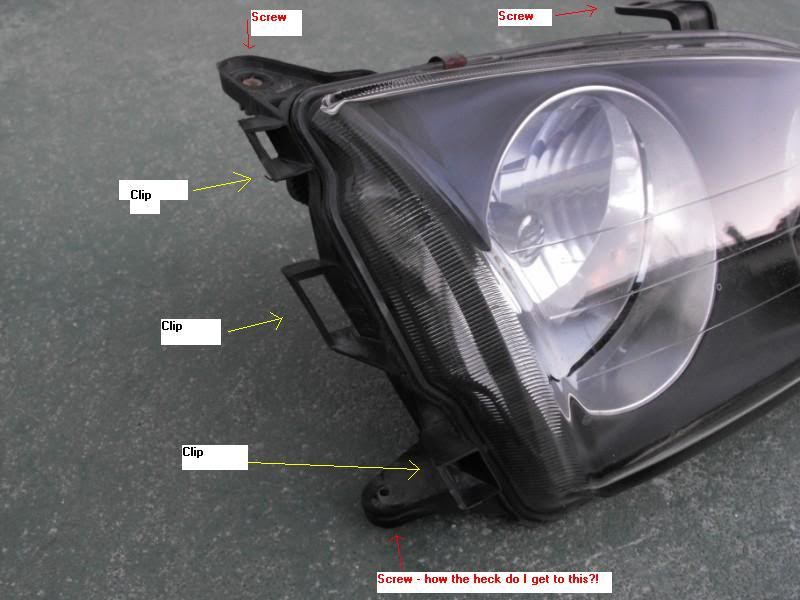
2. Remove the two screws on top of the light. You can also remove the screw on the inner side of the light, that attaches the filler panel to the underside of the light.

3. Remove the plug for the lights - should just pull out, although it's tough to do so.

4. Remove indicator if you can - On the outer part of the light, there are three clips - the top and bottom ones are there to hold the indicator in its location, the "middle" one keeps it in place. It's a two piece clip- push downwards on the top clip, and then outwards.
(this will be easier on drivers side than passenger side - there is a metal bracket in the way)

Unclip indicator from light fitting.

5. Unscrew filler panel from light - bracket is accessible now that indicator has been removed. Also unclip panel from clip at back of panel from body work.

6. Remove headlight - lift the light unit at the screw brackets off of their holders.

Then unhook the light from the bottom bracket. This one is more of a rod/cylinder on the light base that clips onto the car. When you look at the bottom of the light you are putting in, you'll know what I mean.
Last edited by Sick Puppy on Wed Aug 03, 2011 10:09 pm, edited 7 times in total.
Project thread here

Discussion thread here
Sick Puppy
Toyspeed Member
 
Posts: 829
Joined: Fri Jun 17, 2005 10:29 pm
Location: Sydney

Postby xsspeed » Sat May 28, 2011 6:58 pm

I'm pretty sure to rpelace out indicator the headlight came out first, was pretty straight forward form memory, undo the screws, and done.
xsspeed
Toyspeed Member
 
Posts: 3946
Joined: Tue Aug 21, 2007 5:56 pm
Location: Auckland

Postby Sick Puppy » Sun May 29, 2011 11:37 am

Got delayed with posting this, Toyspeed was down last night? :?

Okay, here's what I mean with my mad MS Paint skillz :P
Image
The light has two screws on top, but the third on the bottom, I've no idea how to get to. The light has three clips on the side, I'm presuming I have to remove the indicator, which I'm presuming (again) that it attaches to the clips. Looking at ToyoDIY, the indicator doesn't appear to be attached by bolts to the car...

So when I go to the car mounting, I've got lots of questions:
Image
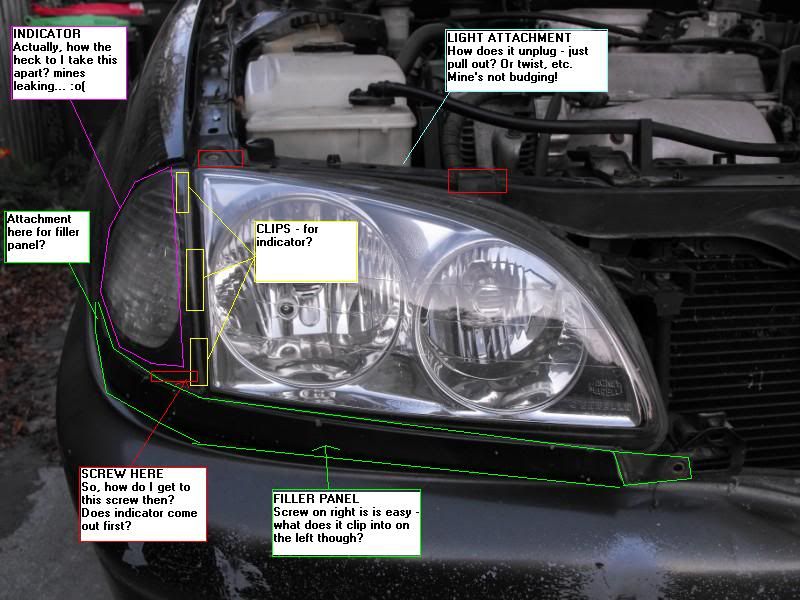
Plug for light - how does this unscrew? Just pull out, or twist? I'm thinking pull firmly, but I'm also good at breaking stuff... :roll:

Filler panel - front screw is easy, but what does it attach to underneath the indicator?

I'm taking a punt here... I have to make my hand half its size to reach under the cross member, around the side of the light, unclip the clips of the indicator to detach it from the light. That gives me access to the screw, and probably the filler panel too. Any pointers, better ideas or advice here? I mean, am I on the right track here? Like I said, I'm good at breaking stuff, and this could be an expensive mistake if I get it wrong lol

Actually, while I'm here, can the indicator be taken apart somehow? Mine is leaking as the top corner is loose. Dunno if it's missing clips, but I figure it needs to be sorted...
Last edited by Sick Puppy on Wed Aug 03, 2011 9:22 pm, edited 1 time in total.
Project thread here

Discussion thread here
Sick Puppy
Toyspeed Member
 
Posts: 829
Joined: Fri Jun 17, 2005 10:29 pm
Location: Sydney

Postby rodstr » Sun May 29, 2011 1:15 pm

maybe someone will beat me to the reply.. the first critical part is the indicator, it is held on by a clip, you put a screwdriver down (second picture left red square) you should push on this clip and the indicator should come forward. just dont push too hard... dont want to break the clip

once off then its pretty straight forward from there, you'll see how its held on
User avatar
rodstr
Toyspeed Member
 
Posts: 152
Joined: Tue Jun 22, 2004 9:40 pm
Location: Hamilton

Postby rodstr » Sun May 29, 2011 1:28 pm

as for lights, its on a plug, so pull. may have a lock clip on it so may need to push that in order for you to pull it off.
User avatar
rodstr
Toyspeed Member
 
Posts: 152
Joined: Tue Jun 22, 2004 9:40 pm
Location: Hamilton

Postby Sick Puppy » Sun May 29, 2011 2:56 pm

rodstr wrote:maybe someone will beat me to the reply.. the first critical part is the indicator, it is held on by a clip, you put a screwdriver down (second picture left red square) you should push on this clip and the indicator should come forward. just dont push too hard... dont want to break the clip

once off then its pretty straight forward from there, you'll see how its held on


That box has a screw doing downwards, as indicated in the first pic. In front and above it though is one of the three clips, so I'll have a go and let you know what happens. Thanks Rodstr! :)

rodstr wrote:as for lights, its on a plug, so pull. may have a lock clip on it so may need to push that in order for you to pull it off.

Cheers for that, I'll have a go on the replacement unit and work it out either way.
Project thread here

Discussion thread here
Sick Puppy
Toyspeed Member
 
Posts: 829
Joined: Fri Jun 17, 2005 10:29 pm
Location: Sydney

Postby rodstr » Sun May 29, 2011 3:24 pm

oh, forgot to mention... in the first pic, the clip you need to push on is the middle hole, the top and bottom holes are positioning holes for the indicator to slide in. So if you push the clip down it (the indicator light) should come forward. once you get the indicator out you should get to the other screws.

hope thats a better explanation
User avatar
rodstr
Toyspeed Member
 
Posts: 152
Joined: Tue Jun 22, 2004 9:40 pm
Location: Hamilton

Postby Sick Puppy » Sun May 29, 2011 4:09 pm

edit: Where were you 20 minutes ago! lol finally figured it out about the clips, I was pushing from side to side, and working the top and bottom ones. Finally, it just... popped out. Thankfully nothing broke, so thanks for the advice!!

Alrighty then... the light is out - yay!

Only had the one squatter to get out 8O

[pic here]

It looked bigger in real life, especially in the fitting next to my finger! lol

Finally got it out when I realised I had forgot about the clip underneath the light. Manouvere the light around, out it pops.

The screw on the left in the pic above holds the filler panel to the light, and the panel in turn clips around / underneath the top of the bumper.

The indicator was full of water - oh no! :( Looks like it's come unglued, probably broke when whatever happened to cause the light to be changed over occurred, and since it wasn't obviously broken... :roll: Made in the UK though, what do I expect! :lol: j/k Had a look at this though, not really too sure, but I'm going to try to take it apart completely, clean it up, and silicon/reglue it. Mould in an indicator is not cool people! :P
Project thread here

Discussion thread here
Sick Puppy
Toyspeed Member
 
Posts: 829
Joined: Fri Jun 17, 2005 10:29 pm
Location: Sydney

Postby rodstr » Sun May 29, 2011 5:25 pm

good that you got it sorted. Not the easiest thing to explain but now you know. I only knew because I had to remove the bumper... but really someone else showed me
User avatar
rodstr
Toyspeed Member
 
Posts: 152
Joined: Tue Jun 22, 2004 9:40 pm
Location: Hamilton

Postby Sick Puppy » Sun May 29, 2011 8:11 pm

rodstr wrote:good that you got it sorted. Not the easiest thing to explain but now you know. I only knew because I had to remove the bumper...
Aaah, about that, where are the bolts for that puppy? Mine's a tad out of alignment... :lol:
Project thread here

Discussion thread here
Sick Puppy
Toyspeed Member
 
Posts: 829
Joined: Fri Jun 17, 2005 10:29 pm
Location: Sydney

Postby rodstr » Mon May 30, 2011 12:19 am

Sick Puppy wrote:
rodstr wrote:good that you got it sorted. Not the easiest thing to explain but now you know. I only knew because I had to remove the bumper...
Aaah, about that, where are the bolts for that puppy? Mine's a tad out of alignment... :lol:


:oops: damn its been a while...

so you want to remove the bumper?

you'll need to remove your headlights and indicators (i think you've mastered that)

go here
http://www.toyodiy.com/parts/p_J_2000_T ... 201.2.html

remove bolts number 90168‑60023 should be one on either side,
2 bolts in front number 90109‑06190 and 90179‑06127 (mines not there)

then 2 screws on either side of the wheel arches, bolts holding them underneath so you'll need to remove the stone guard.

and I'm pretty sure you can find the rest :D
User avatar
rodstr
Toyspeed Member
 
Posts: 152
Joined: Tue Jun 22, 2004 9:40 pm
Location: Hamilton

Postby Sick Puppy » Mon May 30, 2011 12:54 am

rodstr wrote:A whole bunch of very helpful information

Rodstr, you are a life saver, and have probably saved me a fair few hours of my time - thanks heaps!!
Project thread here

Discussion thread here
Sick Puppy
Toyspeed Member
 
Posts: 829
Joined: Fri Jun 17, 2005 10:29 pm
Location: Sydney

Postby rodstr » Mon May 30, 2011 10:42 am

Sorry I gave you the facelift model, but should be the same in where the bolts go...
User avatar
rodstr
Toyspeed Member
 
Posts: 152
Joined: Tue Jun 22, 2004 9:40 pm
Location: Hamilton


Return to Tech Questions

Who is online

Users browsing this forum: Google [Bot] and 6 guests